-
스레드 개수 및 스레드 풀 설정카테고리 없음 2022. 9. 22. 22:23
테스트 환경 설정
환경을 어떻게 설정하고 테스트해야할지 감이 잘 오지 않아서 실험을 여러번 다시했다.
그리고 아직도 완전히 정답을 찾은 것 같지는 않지만 나름대로 이유를 세우면서 테스트를 해보려했다.
1. Nginx에 부하테스트 vs WAS에 부하테스트
처음에는 Nginx 인스턴스에 부하테스트를 했다. 하지만 이건 로드밸런싱 같은 설정이 되어있을 때 더 의미있는 테스트일 것 같다는 의견이 나왔다. 실제로 이번 부하테스트를 통해서 알고 싶은건 스레드 설정이므로 WAS에 직접적으로 테스트를 해도 좋을 것 같았다.2. DB의 데이터 설정
DB에 데이터를 넣지 않고 테스트를 진행하니 TPS가 되게 잘나왔다. 하지만 데이터가 어느정도 들어있고 DB에서 Disk IO가 유의미하게 시간이 걸리는 상황이 우리가 테스트하기를 원하는 상황이었다. 따라서 가능한 실제 서비스와 유사한 환경을 만들어주기 위해 DB에 데이터를 넣고 인덱스도 걸어주었다.3. 테스트 시나리오
 )
)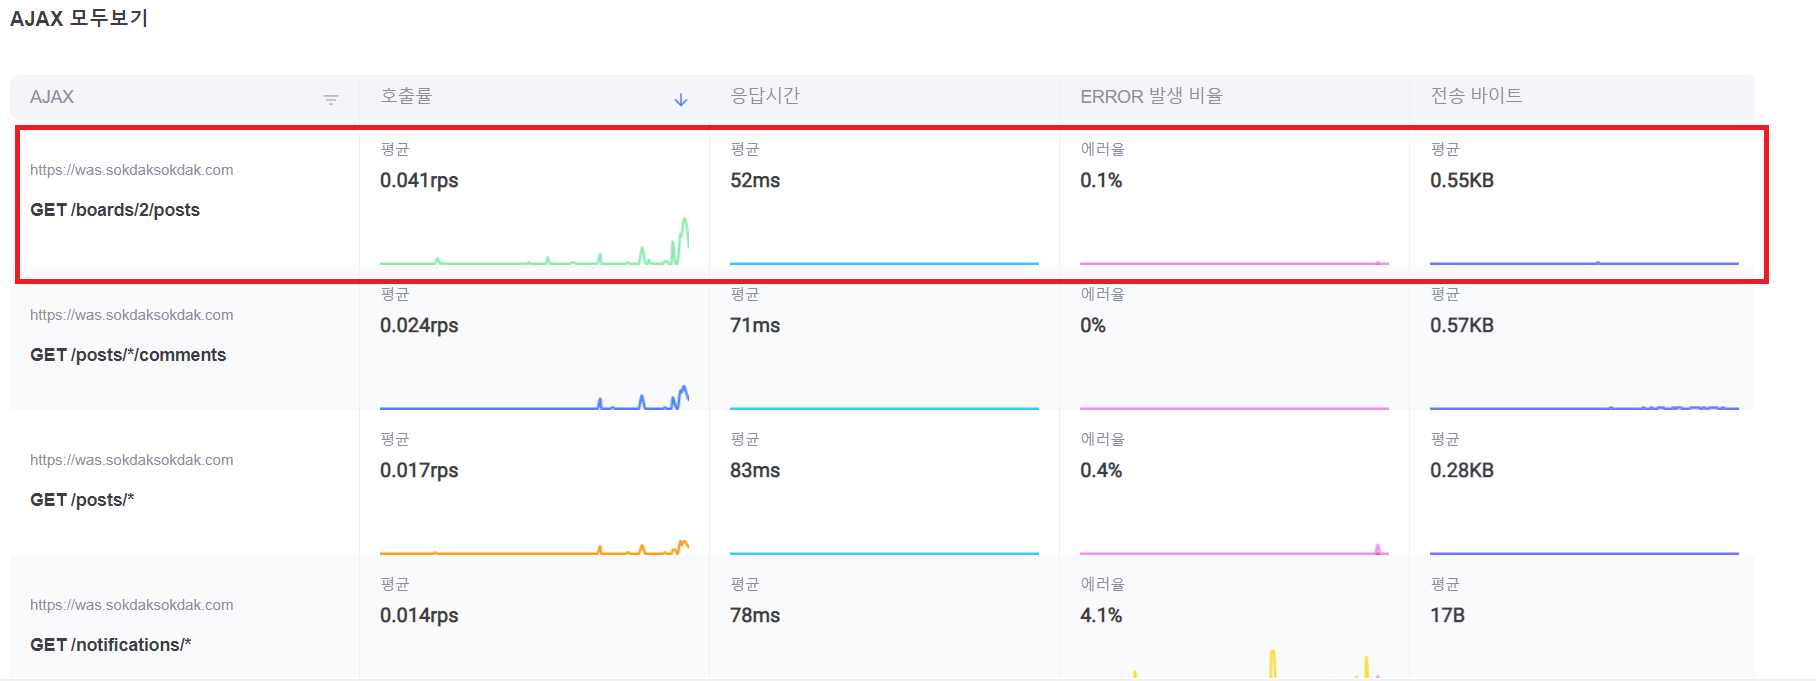
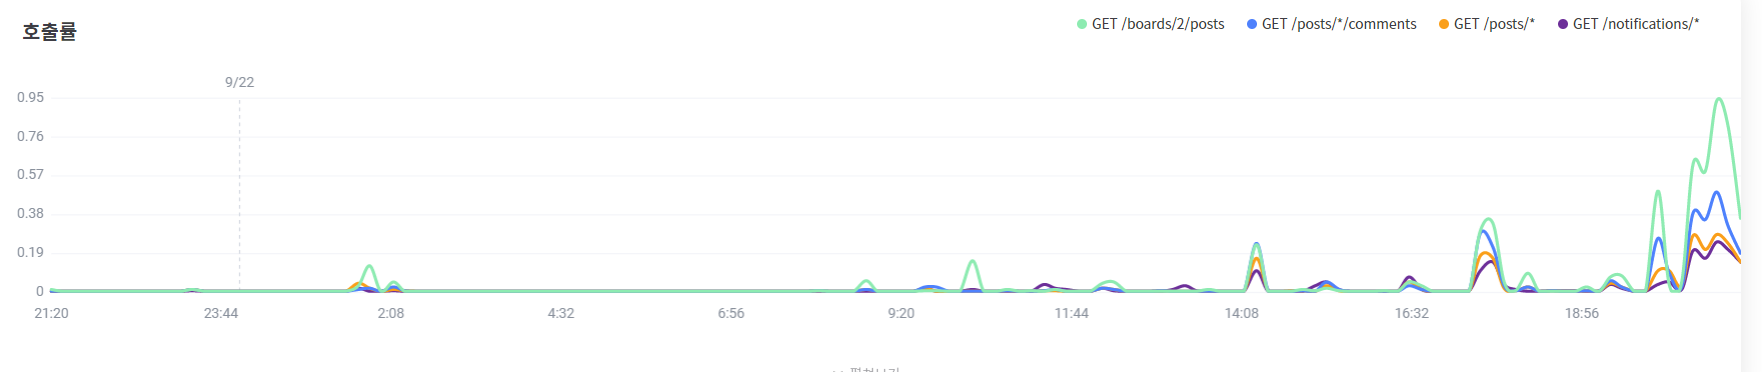
제니퍼 프론트를 통해 요청이 어디에 많이 왔는지 확인했다. 가장 요청이 많이 오는 곳은
GET /boards/2/posts였는데 자유게시판에 접속하는 API였다. 따라서 자유게시판에서 게시글들을 둘러보는 것에 대해 테스트를 진행하기로 했다.부하테스트 스크립트
import static net.grinder.script.Grinder.grinder
import static org.junit.Assert.*
import static org.hamcrest.Matchers.*
import net.grinder.script.GTest
import net.grinder.script.Grinder
import net.grinder.scriptengine.groovy.junit.GrinderRunner
import net.grinder.scriptengine.groovy.junit.annotation.BeforeProcess
import net.grinder.scriptengine.groovy.junit.annotation.BeforeThread
// import static net.grinder.util.GrinderUtils.* // You can use this if you're using nGrinder after 3.2.3
import org.junit.Before
import org.junit.BeforeClass
import org.junit.Test
import org.junit.runner.RunWith

import org.ngrinder.http.HTTPRequest
import org.ngrinder.http.HTTPRequestControl
import org.ngrinder.http.HTTPResponse
import org.ngrinder.http.cookie.Cookie
import org.ngrinder.http.cookie.CookieManager

/**
* A simple example using the HTTP plugin that shows the retrieval of a single page via HTTP.
*
* This script is automatically generated by ngrinder.
*
* @author admin
*/
@RunWith(GrinderRunner)
class TestRunner {

    public static GTest test
    public static HTTPRequest request
    public static Map<String, String> headers = [:]
    public static Map<String, Object> params = [:]
    public static List<Cookie> cookies = []
    public static int count = 0;
    public static Random random = new Random();

    @BeforeProcess
    public static void beforeProcess() {
        HTTPRequestControl.setConnectionTimeout(300000)
        test = new GTest(1, "{WAS IP}")
        request = new HTTPRequest()
        grinder.logger.info("before process.")
    }

    @BeforeThread
    public void beforeThread() {
        test.record(this, "test")
        grinder.statistics.delayReports = true
        grinder.logger.info("before thread.")
    }

    @Before
    public void before() {
        request.setHeaders(headers)
        CookieManager.addCookies(cookies)
        grinder.logger.info("before. init headers and cookies")
    }

    @Test
    public void test() {
        int randompage = random.ints(1,500)
            .findFirst()
            .getAsInt();

        HTTPResponse response = request.GET("http://{WAS IP}:8080/boards/2/posts?size=10&page="+randompage, params)

        if (response.statusCode == 301 || response.statusCode == 302) {
            grinder.logger.info("Warning. The response may not be correct. The response code was {}.", response.statusCode)
        } else if (response.statusCode == 500) {
            count += 1;
            grinder.logger.info("code 500!!! : {}.", count)
        } else {
            assertThat(response.statusCode, is(200))
        }
    }
}
특정 페이지에 대해 조회를 하면 이후에는 캐시에 남아서 정확한 테스트가 안될 수 있다고 생각했다. 그래서 Random을 이용해서 요청마다 랜덤한 페이징으로 요청을 날리도록 했다.
설정 변경 대상
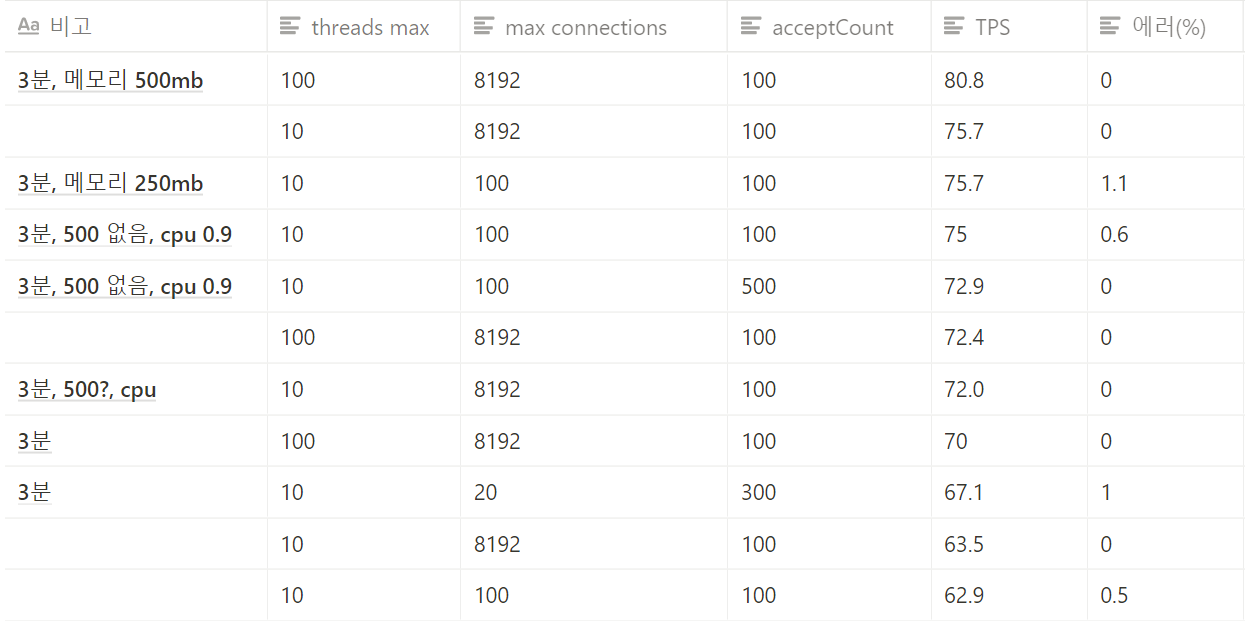
# application.yml
server:
  tomcat:
    threads:
      max: 200
      min-spare: 10
    max-connections: 8192
    accept-count: 100
    connection-timeout: 20000
위 설정은 디폴트 값이다.
 )
)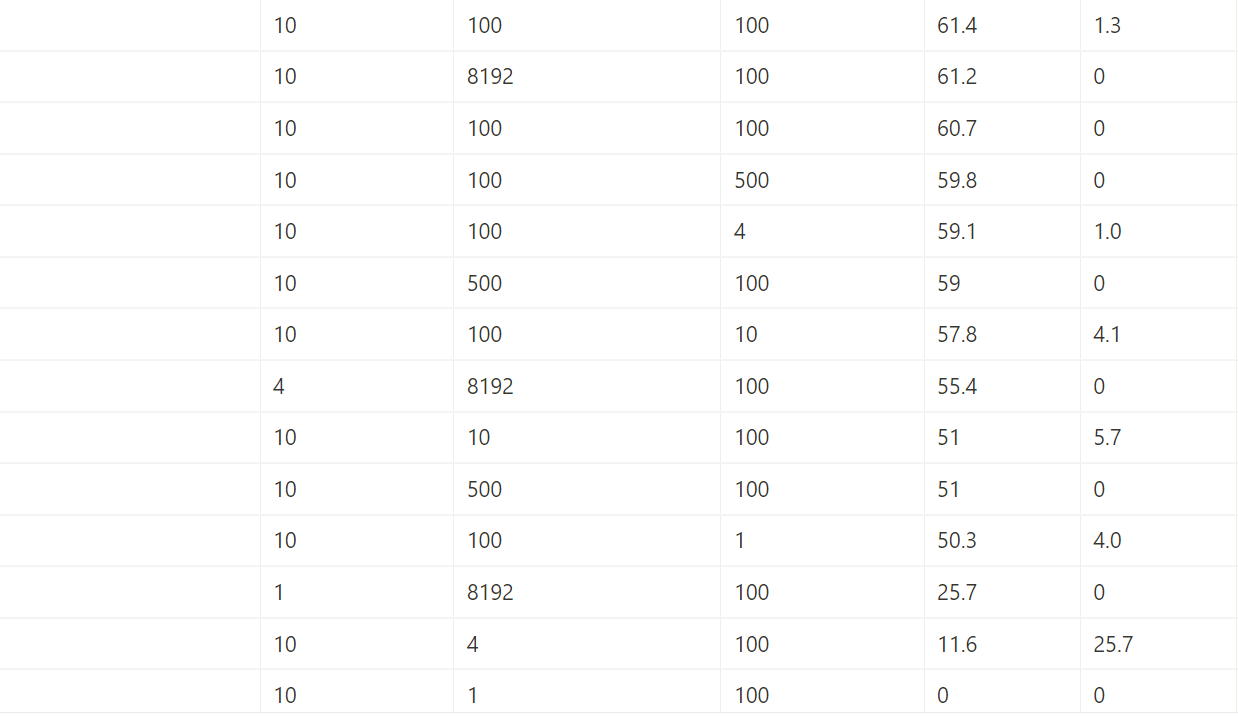
threads-max

# application.yml
server:
  tomcat:
    threads:
      max: 1
      min-spare: 10
    max-connections: 8192
    accept-count: 100
    connection-timeout: 20000
다른 설정은 디폴트이고 max-thread가 1일때 tps가 25.7이 나왔다.
# application.yml
server:
  tomcat:
    threads:
      max: 4
      min-spare: 10
    max-connections: 8192
    accept-count: 100
    connection-timeout: 20000
다른 설정은 디폴트이고 max-thread가 4일때 tps가 55.4가 나왔다.
이후 여러번 테스트를 해봤는데 max-thread가 10일때 가장 잘 나왔고, 그 이후 개수로 늘리면 오히려 tps가 줄어들었다.
accept-count
 )
)
accept-count를 늘려도 유의미한 차이는 없었다.
The maximum length of the operating system provided queue for incoming connection requests when maxConnections has been reached.
처음에는 acceptCount에 대해 잘못이해해서 maxThread가 2이고 accptCount가 1이면 요청을 한번에 10개 보내면 3개만 처리하고 7개는 처리하지 못하는줄 알았다. 하지만 이 연결들은 maxConnections가 잡고 있다. 즉 공식문서에 나온 것처럼 maxConnections가 다 차면 accpet-count가 사용되는 것이다. 우리는 vuser를 500으로 잡았기 때문에 아마 maxConnections 8192개를 다 쓰지 않아 의미있는 변화가 없었던 것 같다.
max-connections

max-connections를 8192로 했을 때와 100개를 했을 때 TPS에서 큰 차이가 없었다. 하지만 max-connections를 줄이니 에러율이 조금 올라갔다.
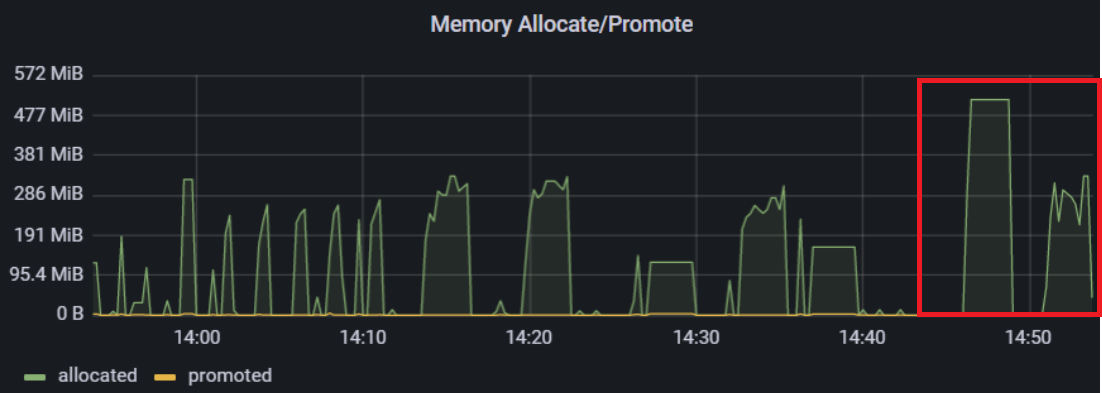
max-connections 개수를 줄이니 메모리 사용량이 줄어들었다. 하지만 당장 메모리가 아주 부족한 것도 아닌데 메모리를 더 쓰더라도 에러율을 줄이는 것이 사용자 입장에서 낫다고 생각했다.
결론
결과적으로 헌치와 나는
max-threads의 개수만 10정도로 줄이고, 나머지는 디폴트 설정으로 놔두기로 했다. 이외에는 변화를 줘도 의미있는 결과가 나오지 않았기 때문이다.기타 및 참고
- 테스트를 하다보니 완벽한 변인통제가 힘들었다. 네트워크 같은 문제가 특히 그랬는데, 같은 설정에 대해 두번 테스트를 하면 결과값이 10%이상 차이나기도 했다. 따라서 테스트 결과는 참고 정도로 생각하면 좋을 것 같다.
- 또 스레드의 개수가 줄어들면 CPU 사용률이 줄어들지 않을까 생각했는데 테스트할 때마다 CPU는 거의 매번 높게 나왔다.
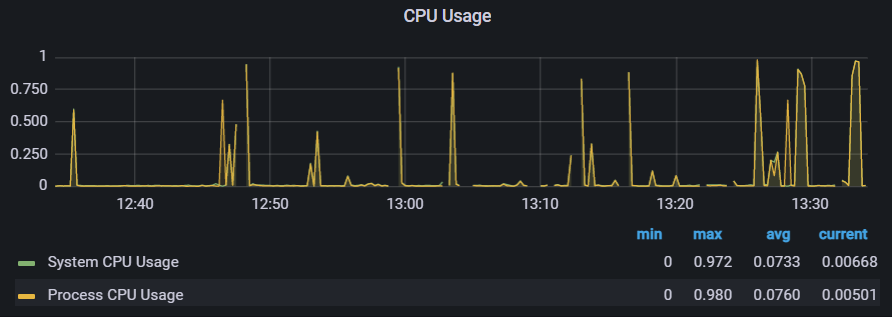
테스트 대상 EC2의 성능이 그리 좋지 않아서 그럴 수도 있겠다라는 생각도 해봤다.